Running out of paper is one of those weird things that only occur when you're on vacancy. The nice side is that I've A Damsel in Distress almost completely written, while not on my hard-drive (I'm missing my PC pretty bad), and some preliminary notes on The Wicked Witch (a remake of the very first ConstantCon adventure ever). I think each adventure will probably take 12-20 pages, A5 format, or thereabouts, with very few art (by me) and a mid-70's fanzine distinctive look. There will be a print run of 20 copies assembled in the basement, and when (if) they sold out I will upload the PDF on DriveThrouRPG. Yes, that means not all of the adventures will eventually be available in PDF form. I'm also thinking of some kind of coding to present each adventure, like Drama, Action and Exploration. A Damsel in Distress, for example, would be Drama 4/5, Action 3/5 and Exploration 2/5. That should help costumers in buying adventures that better fit their DM-ing style. By the way, I'll try to get my hands on a Moleskine notebook this evening, so to have something to collect my notes and inspirational bits for more adventures.

August 20, 2012
August 17, 2012
A Damsel In Distress
Hello readers! I'm writing from Isola d'Elba (Tuscany), feeling so fine. The girlfriend's house here is wonderful, as is the landscape (pictured below). So far no gaming, and I doubt there will be any by the end of our sojourn. Instead, I have plenty of free time to do some adventure writing. Aside from the work on Castle Vorndrang, I had several ideas for one-shot adventures, partly inspired by the stories of Conan I'm reading. My question is, do you think there would be any interest in a series of short, dirty on the cheap adventures, designed to be completed in one or two sessions? I would design them for generic old school Dungeons & Dragons but using only the 3LBBs, making up everything else as I see fit, and possibly including an Appendix for Pathfinder stats.
P.S.: A Damsel In Distress is the tentative title of the first adventure of said line.

August 13, 2012
Ready Set Go
Despite my best efforts to lose the train I eventually managed to leave. I'm now traveling to Florence, and tomorrow I'll be moving to Isola d'Elba with my girlfriend, her brother and her brother's boyfriend. (And yes, this is exactly what I mean to say.) Then on August the 26th we'll fly to Poland, and I will be back home on September the 6th or a few days later. Aside from the fact that I will almost certainly meet Albert (of Terminal Space fame), I also hope to convince the guys at Elba to play a game or two. Hence I spent most of the morning and evening packing up my stuff, and I'm quite pleased by the final result you can admire in the picture. Aside from the very core (3LBBs and dice) I put together a bunch of tables (Jeff's likely doom and carousing, Untimately's random starting equipment, hirelings generated from Meatshields, random NPC names), Castle Vorndrang Level 1, another very cool OPD from Untimately's campaign, 10 copies of my own Adventure Log sheet and 20 character sheets. I can hardly imagine running out of supplies till September. So wish me luck, I will try to write again during the trip, just don't hold your breath. YO.
P.S.: Sorry for the lack of links, I'm writing from the phone.

August 12, 2012
My Mapping Style
"May I ask if that map was drawn freehand, on graph, with tools or on computer?"So, since I'm mapping a new side-dungeon for Castle Vorndrang, this is an how to post to draw maps similar to my own.
Tools: good music, pencil, rubber, trattoPEN, compass, paper, scanner, computer, Photoshop or The Gimp. (This is my choice, so feel free to add/remove any other tool as you see fit.)
 |
| Step 1 |
For first, I mark the paper to delimit a 30 by 30 square grid, and sketch the map in pencil. At this point I usually have a general idea of how I want the final map to look like, and I don't care too much of making errors because I can always correct them later. I don't use any ruler, but having a compass handy for the round sections always proofs to be useful.
 |
| Step 2 |
When I'm done I add the key and stock the damn thing. This is very important, so that when I start inking I've already made all the alterations to rooms and corridors and keys and the map is in its final form.
 |
| Step 3 |
Inking is usually the easier and faster step. A good tip is to start from the upper left corner (if you're right-handed, upper right otherwise) so that you don't end up drooling the fresh ink. (Especially if your hands sweat as fuck as my own do.)
 |
| Step 4 |
At this point I go paramecium. You can choose your own style, or skip this step at all, since we're going to the rock grey anyway.
 |
| Step 5 |
Now I go scan the map as is, in grey scale, just to have a handy copy for when I will erase the pencil (and the key), in case I forget what goes where.
 |
| Step 6 |
Then guess what? Erase the pencil.
 |
| Step 7 |
The scan is where the magic happens: scan in grey-scale AND in B/W without moving the map and setting a low threshold. You can always scan in grey scale only and set the threshold manually in Photoshop (or The Gimp), but it usually takes longer and can proof to be a little tricky if you're not much skilled (which happens to be my case). Also, if you plan to draw many connected maps it makes it difficult to set a "standard".
 |
| Step 8 |
Open the last two scans in Photoshop and on the same canvas, then ctrl + A (select all) and center using the Moving Arrow tool. Be sure the grey scale scan is over the B/W scan.
 |
| Step 9 |
Crop the image to the size you need using the Crop tool (set to delete) following the squares.
 |
| Step 10 |
Now you can delete the grey scale scan layer and here you are your map!
 |
| Step 11 |
Select the space you want to paint in grey using the Magic Wand tool, then create a new layer and paint it black.
 |
| Step 12 |
Fill the blanks using a small round brush (10 px worked well for me). Be sure you're working on the right layer!
 |
| Step 13 |
When you're done, set Layer Opacity to 30% et voilà! The magic happens again.
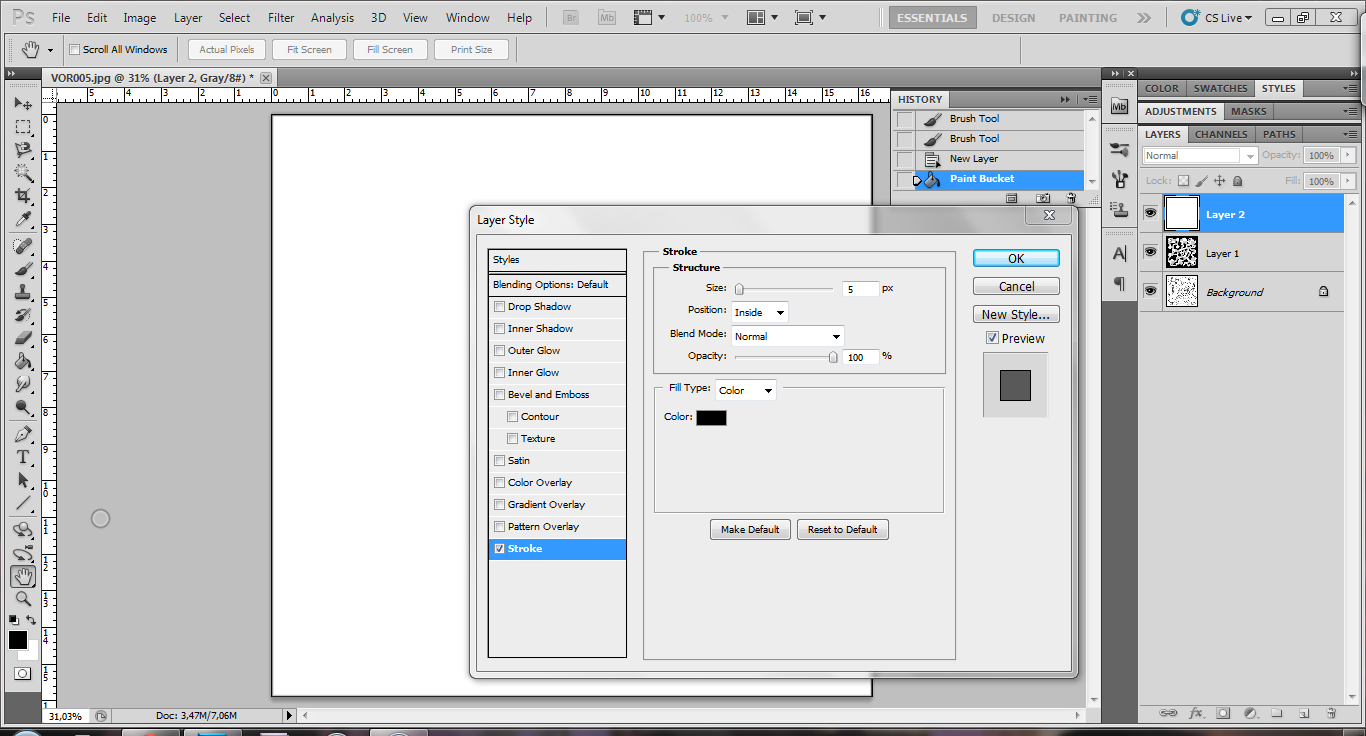 |
| Step 14 |
Create a new layer and paint it white. Then add a Stroke Layer Effect (black, 5px, inside) and change the Layer Mode to Multiply. This way you have a nice, simple frame for your map.
 |
| Step 15 |
Add numbers and keys using the early grey scale scan as reference. I use Century Gothic, bold, 12pt.
 |
| Step 16 |
August 11, 2012
DIY OR DIE - AKA Get Ready For Summer
I had these OD&D re-creation files sitting in my hard-drive from quite a while. Not the awful scans from WotC, nor polished scans of the original, but a friggin' re-creation with the original fonts and art and everything!
 |
| Suck it, WIZ |
Now, I can't really explain the orange cover. I just kinda woke up in that state of mind and went for it. And I'm soooooo glad I did it.
 |
| TU&WA is ready for some stapling |
Stapling is always hard for me, and this time I figured that using a "drive" sheet of A5 paper would have been better than fucking around with the ruler all the time. It was a good idea, after all.
 |
| You can't really tell what fetishism is all about until you buy yourself a long reach stapler |
At this point, I only had to trim and fold. Now, you probably know that we have no letter-sized paper in this godforsaken corner of the earth, but I just didn't like how my booklets looked with all that empty space. So I trimmed and trimmed and trimmed until I got "mini" versions of the originals.
 |
| The smaller the merrier I say |
And finally my summertime copies and the originals, side by side!
 |
| My precioussssssss! |
If you ask me what playing OD&D is really all about, well, that's it. It's about doing things yourself. It's about being creative. It's about spending an entire evening absorbed by the joys of home publishing. It's about playing the fuck out of this game rather than complaining about it all the time. And now, just because I took all these pics with Instagram, this.
 |
| You ain't no hipster if you don't photograph your feet. |
(Almost) Ready for Poland.