
"May I ask if that map was drawn freehand, on graph, with tools or on computer?"So, since I'm mapping a new side-dungeon for Castle Vorndrang, this is an how to post to draw maps similar to my own.
Tools: good music, pencil, rubber, trattoPEN, compass, paper, scanner, computer, Photoshop or The Gimp. (This is my choice, so feel free to add/remove any other tool as you see fit.)
 |
| Step 1 |
For first, I mark the paper to delimit a 30 by 30 square grid, and sketch the map in pencil. At this point I usually have a general idea of how I want the final map to look like, and I don't care too much of making errors because I can always correct them later. I don't use any ruler, but having a compass handy for the round sections always proofs to be useful.
 |
| Step 2 |
When I'm done I add the key and stock the damn thing. This is very important, so that when I start inking I've already made all the alterations to rooms and corridors and keys and the map is in its final form.
 |
| Step 3 |
Inking is usually the easier and faster step. A good tip is to start from the upper left corner (if you're right-handed, upper right otherwise) so that you don't end up drooling the fresh ink. (Especially if your hands sweat as fuck as my own do.)
 |
| Step 4 |
At this point I go paramecium. You can choose your own style, or skip this step at all, since we're going to the rock grey anyway.
 |
| Step 5 |
Now I go scan the map as is, in grey scale, just to have a handy copy for when I will erase the pencil (and the key), in case I forget what goes where.
 |
| Step 6 |
Then guess what? Erase the pencil.
 |
| Step 7 |
The scan is where the magic happens: scan in grey-scale AND in B/W without moving the map and setting a low threshold. You can always scan in grey scale only and set the threshold manually in Photoshop (or The Gimp), but it usually takes longer and can proof to be a little tricky if you're not much skilled (which happens to be my case). Also, if you plan to draw many connected maps it makes it difficult to set a "standard".
 |
| Step 8 |
Open the last two scans in Photoshop and on the same canvas, then ctrl + A (select all) and center using the Moving Arrow tool. Be sure the grey scale scan is over the B/W scan.
 |
| Step 9 |
Crop the image to the size you need using the Crop tool (set to delete) following the squares.
 |
| Step 10 |
Now you can delete the grey scale scan layer and here you are your map!
 |
| Step 11 |
Select the space you want to paint in grey using the Magic Wand tool, then create a new layer and paint it black.
 |
| Step 12 |
Fill the blanks using a small round brush (10 px worked well for me). Be sure you're working on the right layer!
 |
| Step 13 |
When you're done, set Layer Opacity to 30% et voilà! The magic happens again.
 |
| Step 14 |
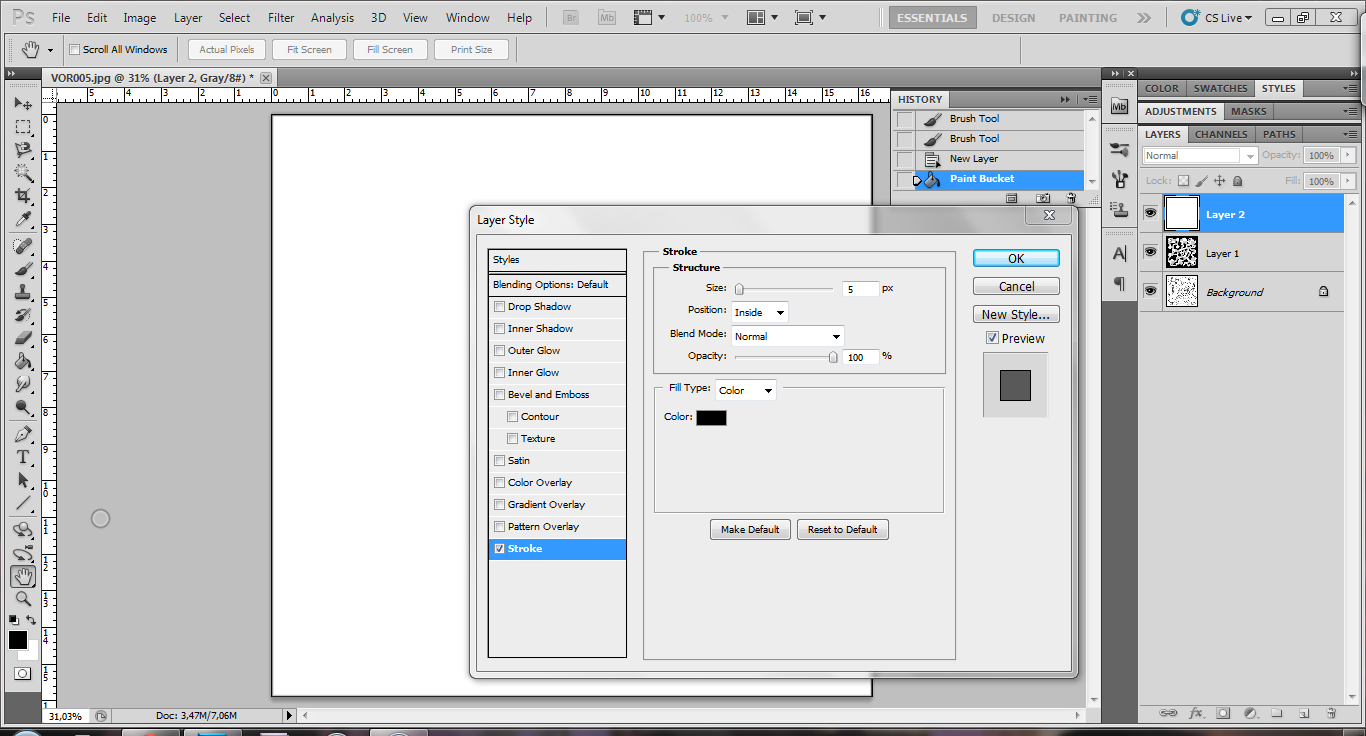
Create a new layer and paint it white. Then add a Stroke Layer Effect (black, 5px, inside) and change the Layer Mode to Multiply. This way you have a nice, simple frame for your map.
 |
| Step 15 |
Add numbers and keys using the early grey scale scan as reference. I use Century Gothic, bold, 12pt.
 |
| Step 16 |
And here it is the final map, complete with the compass. TA-DAAN! Now you can have fun making your own!
