
"May I ask if that map was drawn freehand, on graph, with tools or on computer?"So, since I'm mapping a new side-dungeon for Castle Vorndrang, this is an how to post to draw maps similar to my own.
Tools: good music, pencil, rubber, trattoPEN, compass, paper, scanner, computer, Photoshop or The Gimp. (This is my choice, so feel free to add/remove any other tool as you see fit.)
 |
| Step 1 |
For first, I mark the paper to delimit a 30 by 30 square grid, and sketch the map in pencil. At this point I usually have a general idea of how I want the final map to look like, and I don't care too much of making errors because I can always correct them later. I don't use any ruler, but having a compass handy for the round sections always proofs to be useful.
 |
| Step 2 |
When I'm done I add the key and stock the damn thing. This is very important, so that when I start inking I've already made all the alterations to rooms and corridors and keys and the map is in its final form.
 |
| Step 3 |
Inking is usually the easier and faster step. A good tip is to start from the upper left corner (if you're right-handed, upper right otherwise) so that you don't end up drooling the fresh ink. (Especially if your hands sweat as fuck as my own do.)
 |
| Step 4 |
At this point I go paramecium. You can choose your own style, or skip this step at all, since we're going to the rock grey anyway.
 |
| Step 5 |
Now I go scan the map as is, in grey scale, just to have a handy copy for when I will erase the pencil (and the key), in case I forget what goes where.
 |
| Step 6 |
Then guess what? Erase the pencil.
 |
| Step 7 |
The scan is where the magic happens: scan in grey-scale AND in B/W without moving the map and setting a low threshold. You can always scan in grey scale only and set the threshold manually in Photoshop (or The Gimp), but it usually takes longer and can proof to be a little tricky if you're not much skilled (which happens to be my case). Also, if you plan to draw many connected maps it makes it difficult to set a "standard".
 |
| Step 8 |
Open the last two scans in Photoshop and on the same canvas, then ctrl + A (select all) and center using the Moving Arrow tool. Be sure the grey scale scan is over the B/W scan.
 |
| Step 9 |
Crop the image to the size you need using the Crop tool (set to delete) following the squares.
 |
| Step 10 |
Now you can delete the grey scale scan layer and here you are your map!
 |
| Step 11 |
Select the space you want to paint in grey using the Magic Wand tool, then create a new layer and paint it black.
 |
| Step 12 |
Fill the blanks using a small round brush (10 px worked well for me). Be sure you're working on the right layer!
 |
| Step 13 |
When you're done, set Layer Opacity to 30% et voilà! The magic happens again.
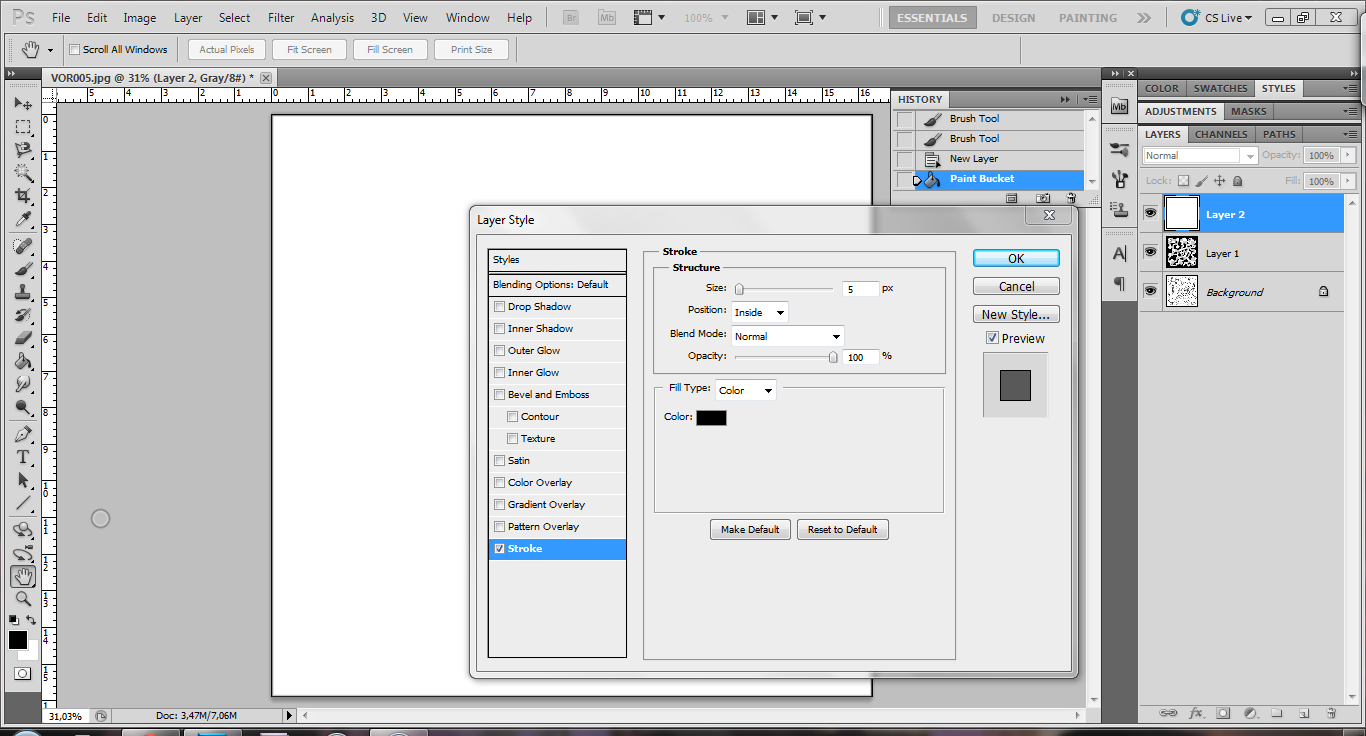 |
| Step 14 |
Create a new layer and paint it white. Then add a Stroke Layer Effect (black, 5px, inside) and change the Layer Mode to Multiply. This way you have a nice, simple frame for your map.
 |
| Step 15 |
Add numbers and keys using the early grey scale scan as reference. I use Century Gothic, bold, 12pt.
 |
| Step 16 |
And here it is the final map, complete with the compass. TA-DAAN! Now you can have fun making your own!
Thanks for showing that in such detail. It sounds a bit laborious for me, but it certainly gets impressive results. I was convinced that you were using some kind of drafting program it's so clean.
ReplyDeleteVery kewl, was using Gimp tonite to help the eldest offspring with some homework, looks like I'll be at it again soon! Thanks!
ReplyDeleteERIC!